Introduction: The Ultimate Chicken Parm Sandwich at Home
There are few sandwiches that inspire universal devotion, but the Chicken Parmesan Sandwich is undoubtedly one of them. It’s the stuff of deli dreams and pub menu legends—a glorious, messy, and utterly satisfying masterpiece that combines the best of Italian-American comfort food into one handheld feast. You know the one: with a crispy, golden-brown chicken cutlet, smothered in rich marinara sauce and buried under a blanket of melted mozzarella and provolone, all nestled within a perfectly toasted roll. It’s the sandwich you crave.
Yet, so often, the reality doesn’t live up to the fantasy. The version you get can be a disappointment—a soggy, greasy, and underwhelming imitation where the chicken is rubbery, the sauce is bland, and the bread falls apart. You’re left feeling overcharged and underwhelmed, wondering if it’s possible to achieve that perfect balance of crispiness, cheesy goodness, and savory flavor at home.
We’re here to tell you that it is not only possible—it’s easier than you think. This recipe is your blueprint for creating the ultimate Chicken Parm Sandwich in your own kitchen. We’re talking about a juicy, tender chicken cutlet with a shatteringly crisp coating that stands up to the sauce, a quick homemade marinara that bursts with bright tomato flavor, and cheese that melts into a glorious, stretchy blanket. This is about mastering the art of the sandwich, from selecting the right bread to achieving the perfect melt without sacrificing that essential crunch.
This is more than just a recipe; it’s a promise of a better sandwich. It’s about reclaiming a classic and making it yours, exactly how you like it. So, preheat your oven and get your skillet ready. Let’s create a sandwich so good, you’ll never settle for a subpar version again. First up: gathering the simple, high-quality ingredients that make all the difference.
Gathering Your Ingredients for Maximum Flavor
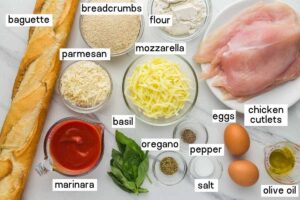
The journey to an unforgettable Chicken Parm Sandwich begins not at the stove, but in your pantry and refrigerator. The magic of this iconic sandwich lies in the harmony of its components, and using high-quality, purposefully chosen ingredients is the non-negotiable first step to achieving that perfect balance of crispy, savory, cheesy, and saucy in every single bite. This isn’t about a long list of gourmet items; it’s about understanding the role each element plays and selecting the best versions you can find to build layers of flavor.
The Foundation: Chicken and Breading
-
The Chicken: 1 large boneless, skinless chicken breast (about ½ lb) is the ideal starting point. You’ll butterfly and pound it to an even ½-inch thickness. This technique is crucial—it ensures quick, even cooking and creates the ideal wide, thin canvas for your sandwich. For the most tender result, you can briefly brine it in salted water.
-
The Breading Station: The trilogy for a crispy, durable crust is all-purpose flour, 1-2 beaten eggs, and Italian-seasoned breadcrumbs. The flour provides the initial glue, the egg acts as the binding agent, and the breadcrumbs deliver the final crunch and classic flavor. For a superior, craggier texture, panko breadcrumbs are an excellent choice.
The Soul: Sauce and Cheese
-
The Sauce: While a good-quality jarred marinara works in a pinch, taking 10 minutes to simmer your own simple sauce makes a monumental difference. You’ll need crushed tomatoes, garlic, olive oil, and dried oregano. The fresh, bright flavor of a quick homemade sauce will elevate the entire sandwich, cutting through the richness of the cheese and chicken.
-
The Cheese: The choice of cheese is critical for the iconic “melt.” A combination is best: low-moisture, whole-milk mozzarella delivers that perfect stretch, while a few slices of provolone offer a sharper, more complex flavor that stands up to the other ingredients. Always shred your own mozzarella from a block; pre-shredded cheese contains anti-caking agents that prevent it from melting smoothly.
The Structure: Bread and Aromatics
-
The Bread: The vessel matters. You need a roll that is sturdy enough to hold the fillings without collapsing, yet soft enough to be enjoyable. Italian hero rolls, ciabatta rolls, or a section of French bread are perfect choices. They have a crisp exterior and a soft, airy interior that won’t get soggy too quickly.
-
The Aromatics: 1-2 cloves of garlic and fresh basil leaves are the finishing touches. Rubbing the toasted bread with a raw garlic clove and adding fresh basil before assembling adds a punch of aromatic freshness that makes the sandwich taste gourmet.
Why This Combination Works:
Each ingredient has a job. The bread provides structure and soak-ability. The breaded chicken offers crunch and substance. The sauce brings moisture and tangy acidity. The cheese delivers richness and that essential melt. And the fresh basil provides a final, bright note. With your ingredients assembled, you’re ready to move on to the most important technique: creating the perfect, crispy chicken cutlet.

Preparing the Chicken: Tips for a Crispy, Juicy Cutlet
The heart and soul of a great Chicken Parm Sandwich is, without a doubt, the chicken cutlet itself. This is where the battle against sogginess is won and where you build the foundational texture and flavor for the entire sandwich. A perfect cutlet is golden brown, shatteringly crisp on the outside, and remains incredibly juicy on the inside, even after being topped with sauce and cheese. Mastering this process is the single most important step in your sandwich journey.
Step 1: The Butterfly and Pound Technique
Start with 1 large boneless, skinless chicken breast. To ensure it cooks quickly and evenly, you need to create a uniform thickness.
-
Butterflying: Place the breast on a cutting board. With your hand flat on top, use a sharp knife to slice it horizontally almost all the way through, then open it like a book.
-
Pounding: Place the butterflied breast between two sheets of plastic wrap or in a large zip-top bag. Using the flat side of a meat mallet, a rolling pin, or a heavy skillet, gently pound the chicken to an even ½-inch thickness. This tenderizes the meat and creates the ideal shape for your sandwich.
Step 2: The Crucial Dry Brine (Optional but Recommended)
For the juiciest possible result, generously season both sides of the pounded chicken with kosher salt and let it rest on a wire rack in the refrigerator for at least 30 minutes, or up to 4 hours. This process, called dry brining, allows the salt to season the meat deeply and helps it retain its natural juices during cooking.
Step 3: The Standard Breading Procedure (The Key to Adhesion)
This three-step setup is a classic for a reason—it creates a seal that locks in juices and provides the structure for the crust.
-
The Dredge (Flour): Place ½ cup of all-purpose flour on a plate. Season it with black pepper. Dredge each chicken cutlet in the flour, shaking off any excess. The thin layer of flour helps the next layer stick.
-
The Bath (Egg): In a shallow bowl, whisk 1-2 large eggs. Dip the floured cutlet into the egg, ensuring it’s fully coated and allowing any excess to drip off.
-
The Crust (Breadcrumbs): On another plate, spread out 1 cup of Italian-seasoned breadcrumbs or panko. Press the egg-coated cutlet firmly into the breadcrumbs, ensuring a thorough, even coating on both sides. For an extra-thick crust, you can double-dip by going back into the egg and breadcrumbs again.
Step 4: The Resting Period
Place the breaded cutlets on a wire rack (not a plate) and let them rest for 5-10 minutes. This allows the breading to hydrate and set, which prevents it from sloughing off in the oil.
Step 5: Choosing Your Cooking Method
-
Pan-Frying (Recommended for Maximum Crispness): Heat ¼ inch of a neutral, high-heat oil (like avocado or canola) in a heavy skillet over medium heat until shimmering (around 350°F/175°C). Carefully add the cutlets and fry for 3-4 minutes per side until deeply golden brown and cooked through.
-
Baking (A Lighter Alternative): Preheat your oven to 400°F (200°C). Place the breaded cutlets on a wire rack set over a baking sheet. Lightly spray both sides with oil. Bake for 15-20 minutes, flipping halfway, until cooked through and crispy.
Your chicken cutlet is now a masterpiece of texture—crispy, golden, and juicy. It’s the sturdy foundation upon which you’ll build the rest of your sandwich. Next, we’ll create a simple, vibrant marinara sauce to complement it perfectly.


