You are currently viewing The Best Chicken Parm Sandwich Recipe (Crispy & Cheesy!)

The Best Chicken Parm Sandwich Recipe (Crispy & Cheesy!)

Introduction: The Ultimate Chicken Parm Sandwich at Home

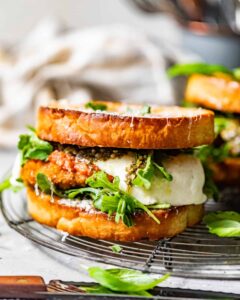
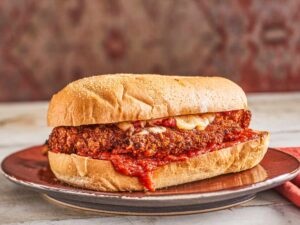
There are few sandwiches that inspire universal devotion, but the Chicken Parmesan Sandwich is undoubtedly one of them. It’s the stuff of deli dreams and pub menu legends—a glorious, messy, and utterly satisfying masterpiece that combines the best of Italian-American comfort food into one handheld feast. You know the one: with a crispy, golden-brown chicken cutlet, smothered in rich marinara sauce and buried under a blanket of melted mozzarella and provolone, all nestled within a perfectly toasted roll. It’s the sandwich you crave.

Yet, so often, the reality doesn’t live up to the fantasy. The version you get can be a disappointment—a soggy, greasy, and underwhelming imitation where the chicken is rubbery, the sauce is bland, and the bread falls apart. You’re left feeling overcharged and underwhelmed, wondering if it’s possible to achieve that perfect balance of crispiness, cheesy goodness, and savory flavor at home.

We’re here to tell you that it is not only possible—it’s easier than you think. This recipe is your blueprint for creating the ultimate Chicken Parm Sandwich in your own kitchen. We’re talking about a juicy, tender chicken cutlet with a shatteringly crisp coating that stands up to the sauce, a quick homemade marinara that bursts with bright tomato flavor, and cheese that melts into a glorious, stretchy blanket. This is about mastering the art of the sandwich, from selecting the right bread to achieving the perfect melt without sacrificing that essential crunch.

This is more than just a recipe; it’s a promise of a better sandwich. It’s about reclaiming a classic and making it yours, exactly how you like it. So, preheat your oven and get your skillet ready. Let’s create a sandwich so good, you’ll never settle for a subpar version again. First up: gathering the simple, high-quality ingredients that make all the difference.

Gathering Your Ingredients for Maximum Flavor

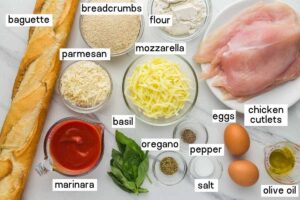
The journey to an unforgettable Chicken Parm Sandwich begins not at the stove, but in your pantry and refrigerator. The magic of this iconic sandwich lies in the harmony of its components, and using high-quality, purposefully chosen ingredients is the non-negotiable first step to achieving that perfect balance of crispy, savory, cheesy, and saucy in every single bite. This isn’t about a long list of gourmet items; it’s about understanding the role each element plays and selecting the best versions you can find to build layers of flavor.

The Foundation: Chicken and Breading

  • The Chicken: 1 large boneless, skinless chicken breast (about ½ lb) is the ideal starting point. You’ll butterfly and pound it to an even ½-inch thickness. This technique is crucial—it ensures quick, even cooking and creates the ideal wide, thin canvas for your sandwich. For the most tender result, you can briefly brine it in salted water.

  • The Breading Station: The trilogy for a crispy, durable crust is all-purpose flour, 1-2 beaten eggs, and Italian-seasoned breadcrumbs. The flour provides the initial glue, the egg acts as the binding agent, and the breadcrumbs deliver the final crunch and classic flavor. For a superior, craggier texture, panko breadcrumbs are an excellent choice.

The Soul: Sauce and Cheese

  • The Sauce: While a good-quality jarred marinara works in a pinch, taking 10 minutes to simmer your own simple sauce makes a monumental difference. You’ll need crushed tomatoes, garlic, olive oil, and dried oregano. The fresh, bright flavor of a quick homemade sauce will elevate the entire sandwich, cutting through the richness of the cheese and chicken.

  • The Cheese: The choice of cheese is critical for the iconic “melt.” A combination is best: low-moisture, whole-milk mozzarella delivers that perfect stretch, while a few slices of provolone offer a sharper, more complex flavor that stands up to the other ingredients. Always shred your own mozzarella from a block; pre-shredded cheese contains anti-caking agents that prevent it from melting smoothly.

The Structure: Bread and Aromatics

  • The Bread: The vessel matters. You need a roll that is sturdy enough to hold the fillings without collapsing, yet soft enough to be enjoyable. Italian hero rolls, ciabatta rolls, or a section of French bread are perfect choices. They have a crisp exterior and a soft, airy interior that won’t get soggy too quickly.

  • The Aromatics: 1-2 cloves of garlic and fresh basil leaves are the finishing touches. Rubbing the toasted bread with a raw garlic clove and adding fresh basil before assembling adds a punch of aromatic freshness that makes the sandwich taste gourmet.

Why This Combination Works:
Each ingredient has a job. The bread provides structure and soak-ability. The breaded chicken offers crunch and substance. The sauce brings moisture and tangy acidity. The cheese delivers richness and that essential melt. And the fresh basil provides a final, bright note. With your ingredients assembled, you’re ready to move on to the most important technique: creating the perfect, crispy chicken cutlet.
%fChicken Salad with Grapes %

 Preparing the Chicken: Tips for a Crispy, Juicy Cutlet

The heart and soul of a great Chicken Parm Sandwich is, without a doubt, the chicken cutlet itself. This is where the battle against sogginess is won and where you build the foundational texture and flavor for the entire sandwich. A perfect cutlet is golden brown, shatteringly crisp on the outside, and remains incredibly juicy on the inside, even after being topped with sauce and cheese. Mastering this process is the single most important step in your sandwich journey.

Step 1: The Butterfly and Pound Technique
Start with 1 large boneless, skinless chicken breast. To ensure it cooks quickly and evenly, you need to create a uniform thickness.

  • Butterflying: Place the breast on a cutting board. With your hand flat on top, use a sharp knife to slice it horizontally almost all the way through, then open it like a book.

  • Pounding: Place the butterflied breast between two sheets of plastic wrap or in a large zip-top bag. Using the flat side of a meat mallet, a rolling pin, or a heavy skillet, gently pound the chicken to an even ½-inch thickness. This tenderizes the meat and creates the ideal shape for your sandwich.

Step 2: The Crucial Dry Brine (Optional but Recommended)
For the juiciest possible result, generously season both sides of the pounded chicken with kosher salt and let it rest on a wire rack in the refrigerator for at least 30 minutes, or up to 4 hours. This process, called dry brining, allows the salt to season the meat deeply and helps it retain its natural juices during cooking.

Step 3: The Standard Breading Procedure (The Key to Adhesion)
This three-step setup is a classic for a reason—it creates a seal that locks in juices and provides the structure for the crust.

  1. The Dredge (Flour): Place ½ cup of all-purpose flour on a plate. Season it with black pepper. Dredge each chicken cutlet in the flour, shaking off any excess. The thin layer of flour helps the next layer stick.

  2. The Bath (Egg): In a shallow bowl, whisk 1-2 large eggs. Dip the floured cutlet into the egg, ensuring it’s fully coated and allowing any excess to drip off.

  3. The Crust (Breadcrumbs): On another plate, spread out 1 cup of Italian-seasoned breadcrumbs or panko. Press the egg-coated cutlet firmly into the breadcrumbs, ensuring a thorough, even coating on both sides. For an extra-thick crust, you can double-dip by going back into the egg and breadcrumbs again.

Step 4: The Resting Period
Place the breaded cutlets on a wire rack (not a plate) and let them rest for 5-10 minutes. This allows the breading to hydrate and set, which prevents it from sloughing off in the oil.

Step 5: Choosing Your Cooking Method

  • Pan-Frying (Recommended for Maximum Crispness): Heat ¼ inch of a neutral, high-heat oil (like avocado or canola) in a heavy skillet over medium heat until shimmering (around 350°F/175°C). Carefully add the cutlets and fry for 3-4 minutes per side until deeply golden brown and cooked through.

  • Baking (A Lighter Alternative): Preheat your oven to 400°F (200°C). Place the breaded cutlets on a wire rack set over a baking sheet. Lightly spray both sides with oil. Bake for 15-20 minutes, flipping halfway, until cooked through and crispy.

Your chicken cutlet is now a masterpiece of texture—crispy, golden, and juicy. It’s the sturdy foundation upon which you’ll build the rest of your sandwich. Next, we’ll create a simple, vibrant marinara sauce to complement it perfectly.
%fChicken Salad with Grapes %

Crafting a Simple, Flavorful Marinara Sauce

While a store-bought marinara can work, taking just 10 minutes to create your own simple sauce is the single biggest flavor upgrade you can give your Chicken Parm Sandwich. A quick, homemade marinara is brighter, fresher, and more vibrant than any jarred version, cutting through the richness of the fried chicken and cheese with a tangy, herbaceous punch. This isn’t about a long-simmered Sunday gravy; it’s about a no-fuss, powerhouse sauce that lets high-quality ingredients shine.

The Foundation: Quality Canned Tomatoes
The backbone of any great quick marinara is one 28-ounce can of high-quality crushed tomatoes. The quality of your tomato is the quality of your sauce. Look for brands that contain nothing but tomatoes and perhaps salt. San Marzano tomatoes are renowned for their sweet flavor and low acidity, but any good-quality brand will work. Do not use tomato paste or puree—you want the texture of crushed tomatoes.

The Flavor Base: Sautéed Aromatics
The depth of your sauce comes from the soffritto—the sautéed aromatics.

  1. In a saucepan, heat 2 tablespoons of olive oil over medium heat.

  2. Add 2-3 cloves of finely minced garlic and a pinch of red pepper flakes. Sauté for just 30-60 seconds until the garlic is fragrant. Do not let it brown, or it will become bitter.

  3. This is where you can add 1 teaspoon of dried oregano, toasting it briefly in the oil to unlock its full flavor potential.

The Simmer: Marrying the Flavors

  1. Carefully pour in the crushed tomatoes. They may splatter when they hit the hot oil.

  2. Stir in ½ teaspoon of salt and a few cracks of black pepper.

  3. Bring the sauce to a gentle simmer, then immediately reduce the heat to low. Let it cook, uncovered, for 10-15 minutes, stirring occasionally. This brief simmer is enough to meld the flavors and thicken the sauce slightly.

The Finishing Touches: Brightness and Freshness
Once the sauce is off the heat, stir in 1-2 tablespoons of chopped fresh basil and a teaspoon of balsamic vinegar (optional). The fresh basil adds a pop of aroma, and the tiny bit of vinegar doesn’t make the sauce taste vinegary; instead, it brightens the tomato flavor and balances the sweetness.

Pro Tip: Texture Control
Your sandwich sauce should be thick enough to not immediately soak through the bread. If your sauce seems too thin after simmering, you can:

  • Let it simmer for a few more minutes to reduce further.

  • Use a stick blender to puree it briefly, which will also help thicken it.

  • Stir in a tablespoon of tomato paste.

Your sauce is now ready—a vibrant, chunky, and flavorful complement to your crispy chicken. With your two main components prepared, you’re ready for the final act: assembling and melting everything into a perfect, cohesive sandwich.

Assembling and Melting for the Perfect Melt

This is where your carefully prepared components unite to become something greater than the sum of their parts. The goal of assembly is twofold: to achieve a glorious, even cheese melt that binds everything together, and to do so without sacrificing the hard-won crispy texture of your chicken cutlet. This step is a dance between the broiler and your timing, and mastering it is the difference between a good sandwich and an exceptional one.

The Order of Operations: A Strategic Layering
The sequence in which you build your sandwich is crucial for structural integrity and flavor distribution. Follow this order for the best results:

  1. Prepare the Bread: Slice your hero rolls or ciabatta lengthwise, but not all the way through, creating a hinge. If desired, lightly toast the insides under the broiler for 1-2 minutes until just golden. This creates a slight barrier against sogginess.

  2. The Foundation Layer (Sauce on Bread): Spread a thin layer of your warm marinara sauce on the top and bottom interior of the roll. This ensures every bite has sauce and prevents the chicken from making the bread soggy.

  3. The Main Event (Chicken Placement): Place the crispy, hot chicken cutlet directly on the bottom half of the bread.

  4. The Cheesy Blanket: Spoon a moderate amount of additional sauce over the chicken cutlet. Then, immediately cover it with a generous combination of shredded mozzarella and a slice of provolone. The sauce here helps the cheese adhere and melt evenly.

The Melting Method: Broiler vs. Oven
To achieve the perfect melt without overcooking the chicken, you need a direct, high heat source.

  • Broiler Method (Fastest & Most Effective):

    • Place the assembled, open-faced sandwich on a baking sheet.

    • Position the oven rack 5-6 inches below the broiler element and preheat the broiler to high.

    • Carefully place the baking sheet under the broiler for 1-3 minutes. WATCH IT CONSTANTLY. The cheese should melt, bubble, and develop light golden spots. The second it looks perfect, remove it immediately.

  • Oven Method:

    • Preheat your oven to 450°F (225°C).

    • Bake the open-faced sandwich on a baking sheet for 3-5 minutes, or until the cheese is fully melted.

%fChicken Salad with Grapes %

The Final Assembly:
Once the cheese is perfectly melted and bubbly, carefully remove the baking sheet. If you added any optional toppings like pepperoni or sautéed mushrooms, add them now over the melted cheese.

Immediately place the top half of the bread onto the sandwich. Press down gently—just enough to adhere, not so hard that you crush the crispy chicken.

Your Chicken Parm Sandwich is now assembled—a harmonious blend of crispy, saucy, and melty goodness. The final step is to choose the perfect accompaniments to complete your meal.

Choosing the Right Bread and Toasting Techniques

The bread is far more than just a container; it is the structural foundation of your entire sandwich. The wrong choice can lead to a catastrophic collapse or a soggy, disappointing mess. The right bread, however, provides the essential textural contrast of a crisp exterior and a soft, absorbent interior that holds up to the robust fillings without falling apart. Selecting and preparing your bread is a critical step that demands as much attention as the chicken itself.

Selecting the Perfect vessel:
Your goal is a bread that is sturdy enough to handle moisture and weight, yet soft enough to bite through easily.

  • Italian Hero Rolls: The classic choice. Look for rolls with a crispy, slightly flaky exterior and a soft, airy, hole-structured interior. This type of crumb soaks up just enough sauce without becoming mushy.

  • Ciabatta Rolls: An excellent alternative. Ciabatta has a chewy, open crumb and a sturdy, crisp crust that provides fantastic textural contrast.

  • French Bread / Baguette: A section of a softer baguette works well. Avoid crusty, hard artisanal loaves that are too difficult to bite through.

  • What to Avoid: Soft, fluffy sandwich rolls (like potato bread or standard hot dog buns) will disintegrate immediately under the weight and moisture of the ingredients.

The Toasting Technique: A Non-Negotiable Step
Toasting the bread is not optional—it is your primary defense against sogginess. It creates a protective barrier that delays moisture from the sauce and chicken from seeping into the crumb.

  1. Slice and Expose: Slice your chosen roll in half lengthwise, creating a hinge if possible.

  2. Butter or Oil? For the best flavor and crispness, lightly brush the cut sides of the bread with softened butter or olive oil. Butter promotes golden browning, while olive oil adds a subtle flavor.

  3. The Toasting Methods:

    • Broiler: Place the rolls, cut-side-up, on a baking sheet under a preheated broiler for 1-2 minutes. Watch closely until the edges are golden brown.

    • Skillet: For a deeper flavor, place the rolls cut-side-down in a dry, non-stick or cast-iron skillet over medium heat. Press down lightly and toast for 2-3 minutes until deeply golden and crisp.

    • Oven: Bake at 400°F (200°C) for 5-6 minutes.

The Flavor Boost: The Garlic Rub
Immediately after toasting, while the bread is still hot, take a raw clove of garlic that has been cut in half and vigorously rub it over the toasted surface. The heat of the bread will gently cook the garlic and release its aromatic oils, depositing a powerful, fragrant flavor into every nook and cranny. This simple, 10-second step is a professional trick that elevates the entire sandwich.

With your bread expertly selected, toasted, and flavored, you have built a strong, delicious foundation ready to support the weighty, saucy, and cheesy glory of your chicken parm components. The stage is now perfectly set for assembly.

 The Best Sides and Toppings

A perfect Chicken Parm Sandwich is a meal unto itself, but the right accompaniments can elevate it from a quick lunch to a memorable feast. The ideal sides provide contrast—something crisp, fresh, or acidic to cut through the sandwich’s rich, savory, and cheesy goodness. Likewise, a few well-chosen toppings can add a final layer of flavor and texture just before that first glorious bite.

Classic Side Dishes for the Ultimate Pub-Style Meal:
These sides are chosen to complement without competing, offering a satisfying textural and flavor counterpoint.

  • Crispy Seasoned Fries: The undisputed champion of pairing. Salty, crispy fries are perfect for dipping into any extra marinara sauce. Seasoned waffle fries or garlic Parmesan fries take it to the next level.

  • Light Italian Salad: A simple, sharp salad is the perfect palate cleanser. Toss romaine lettuce, red onion, cherry tomatoes, and pepperoncini with a tangy Italian vinaigrette or a bright leony dressing. The acidity and crunch cut through the richness of the sandwich beautifully.

  • Pickled Vegetables: The sharp tang of pickles is a classic pairing for rich, fried foods. Offer giardiniera (Italian pickled vegetables), pepperoncini, or even a simple dill pickle spear on the side.

  • Creamy Coleslaw: A vinegar-based slaw (not a heavy mayo-based one) provides a cool, creamy, and crunchy contrast that balances the warm, cheesy sandwich.

The Finishing Touch: Toppings and Condiments
While the core ingredients are perfect on their own, these optional additions allow everyone to customize their sandwich to their taste.

  • Fresh Herbs: A few leaves of fresh basil added right before serving introduce an aromatic freshness that brightens the entire dish.

  • Heat: For those who like a kick, hot honey drizzled over the cheese is a modern and delicious twist. Alternatively, a sprinkle of red pepper flakes or a few slices of pickled jalapeños work well.

  • Extra Cheese: A light shower of freshly grated Parmesan cheese or shaved Pecorino Romano over the top adds a salty, umami-packed finish.

  • Greens: A handful of fresh arugula or baby spinach placed on the bottom bun adds a peppery note and a layer of freshness that contrasts with the hot chicken and cheese.

Serving Practicality:

  • The Wrap and Rest: For a less messy eating experience, wrap the entire sandwich tightly in parchment paper or foil for just a minute or two before slicing. This allows the heat to gently steam the bread slightly, making it easier to bite through without everything squishing out the sides.

  • The Diagonal Cut: Always slice the sandwich in half on a sharp diagonal. This is not just for presentation; it creates a sturdier structure and makes it easier to handle and dip.

With your sides selected and your toppings ready, your Chicken Parm Sandwich is no longer just a meal—it’s a curated dining experience. The final step is to understand how to handle any leftovers, ensuring your culinary effort continues to deliver enjoyment.

 Make-Ahead Tips and Storage Instructions

A great homemade sandwich doesn’t have to be made start-to-finish in a single effort. With a few smart strategies, you can break the process into manageable steps, making a spectacular Chicken Parm Sandwich an achievable weeknight dinner. Furthermore, knowing how to properly store and resurrect leftovers ensures your hard work continues to deliver pleasure.

Smart Make-Ahead Strategies:

  • The Chicken Cutlets: You can bread and cook the chicken cutlets up to 2 days in advance. Let them cool completely after cooking, then store them in a single layer in an airtight container in the refrigerator. Re-crisp them in a 400°F (200°C) oven or air fryer for 5-7 minutes before assembling.

  • The Marinara Sauce: The sauce can be made up to 5 days ahead and stored in an airtight container in the refrigerator. Gently reheat it on the stovetop or in the microwave before using. In fact, the flavor often improves after a day.

  • The Bread: You can pre-toast the buns a few hours ahead. Store them at room temperature in a paper bag to keep them from getting soft. Avoid plastic, as it can trap steam and make them chewy.

Storing Leftovers:

  • The Assembled Sandwich: Unfortunately, a fully assembled sandwich does not store well and will become soggy. It is always best enjoyed immediately.

  • Component Storage: Store any leftover components separately. Keep cooked chicken, sauce, and cheese in their own airtight containers in the refrigerator for up to 3 days.

Reheating for Best Results:
To enjoy leftover components, reassemble rather than reheat a whole sandwich.

  1. Re-crisp the chicken cutlet in a 400°F (200°C) oven or air fryer for 5-7 minutes.

  2. Warm the sauce separately.

  3. Briefly re-toast the bread if it has softened.

  4. Assemble the sandwich fresh with the hot components and melt the cheese under the broiler.

 Answers to Common Chicken Parm Sandwich Questions (FAQ)

Q1: How do I keep my sandwich from getting soggy?
A: Sogginess is the arch-nemesis of this sandwich. Combat it by:

  1. Toasting the bread thoroughly to create a moisture barrier.

  2. Applying a thin layer of sauce directly to the bread before adding the chicken.

  3. Draining fried chicken on a wire rack, not paper towels.

  4. Assembling and eating the sandwich immediately after melting the cheese.

Q2: Can I bake the chicken instead of frying it?
A: Yes. For a lighter version, place breaded cutlets on a wire rack set over a baking sheet. Lightly spray with oil and bake at 400°F (200°C) for 15-20 minutes, flipping halfway, until cooked through and crispy.

Q3: What’s the best cheese to use?
A: A combination is best. Low-moisture, whole-milk mozzarella provides the perfect melt and stretch, while provolone adds a sharper, more complex flavor. Always shred your own cheese from a block for the best melt.

Q4: Can I make this gluten-free?
A: Absolutely. Use gluten-free all-purpose flour and gluten-free breadcrumbs or panko for the chicken breading. Ensure your buns are certified gluten-free.

Your New Favorite Comfort Food Sandwich

You started with a simple idea—a craving for the perfect Chicken Parm Sandwich. Now, you have the knowledge and the confidence to create it exactly to your liking, any night of the week. You’ve mastered the techniques for a crispy, juicy cutlet, a vibrant homemade sauce, and the art of the perfect melt. You know how to choose your bread like a pro and serve it with sides that turn it into a feast.

This recipe is more than a set of instructions; it’s a template for creating unforgettable comfort food. It proves that with a little care and a few quality ingredients, you can create a sandwich that rivals any restaurant version, right in your own kitchen.

So, the next time that craving hits, you know exactly what to do. Skip the takeout menu, embrace the process, and treat yourself to a homemade masterpiece. You’ve earned it.

Nutrition Facts

  • Serving Size: 1 sandwich

  • Recipe Yields: 2 sandwiches

  • Note: Nutrition is estimated based on using one 4-oz chicken breast, 2 tbsp oil for frying, 1 oz mozzarella, 1 oz provolone, ¼ cup marinara, and a 6-inch Italian roll. Values will vary based on specific ingredients and portion sizes.

Nutrient Amount % Daily Value*
Calories ~780
Total Fat 32 g 41%
Saturated Fat 11 g 55%
Cholesterol 115 mg 38%
Sodium ~1,480 mg 64%
Total Carbohydrate 75 g 27%
Dietary Fiber 5 g 18%
Sugars 10 g
Protein 45 g 90%
Vitamin D 1 mcg 6%
Calcium 480 mg 37%
Iron 5 mg 28%
Potassium 640 mg 14%

Percent Daily Values are based on a 2,000 calorie diet. Your daily values may be higher or lower depending on your calorie needs.

Key Nutritional Highlights & Considerations:

  • High in Protein: This sandwich is an excellent source of protein, essential for muscle repair and keeping you feeling full and satisfied.

  • Moderate Calories: The calorie count is substantial, making it a fulfilling meal. For a lighter version, see the FAQ below.

  • Sodium Content: The sodium level is significant, primarily from the bread, cheese, and sauce. To reduce sodium, use low-sodium cheese and marinara, and be mindful of salt added during cooking.

  • Customizable: The fat and carbohydrate content can be adjusted by baking the chicken, using less cheese, or choosing a different bun.